This page provides guidance on creating assignments and course handouts that align with the requirements of Title II of the Americans with Disabilities Act.
Canvas assignments
Building assignments and documents to share with students directly in Canvas will put you on the quickest path toward accessibility. Unlike Word or PDF documents, Canvas uses HTML, which makes text more adaptable for different screen sizes and works well with screen readers. The information below focuses on how to make the information in a Canvas assignment more accessible. New to Canvas? – Learn how to create an assignment in Canvas.
- Select the “Edit” button near the top of the Canvas assignment you would like to make more accessible.
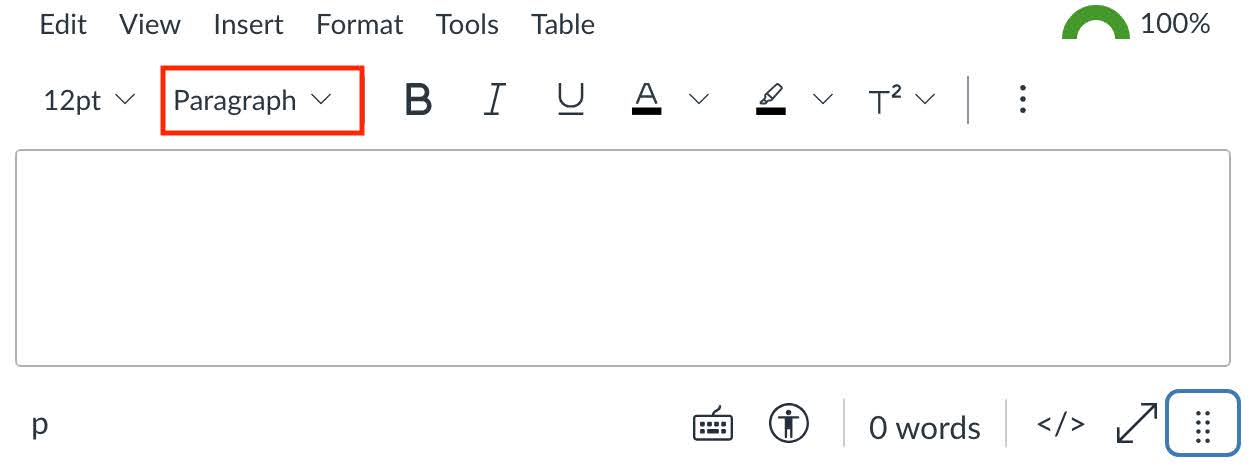
- In the instructions area, highlight the text that you want to become the heading.
- Select the text box that says “Paragraph” (second from the left) in the editing menu. Headings should form an outline of content in your assignment instructions, so choose the heading that corresponds to the structure of your content. Headings for major sections of your instructions should use Heading 2 (Canvas automatically makes the page title a Heading 1). Sub-headings under main headings should use Heading 3. Subsequent subheadings should use Heading 4. Headings should always proceed chronologically and not skip levels.
- Save.
- If you’re not already in edit mode, select the “Edit” button near the top of the page.
- Copy the URL you would like to include in your assignment.
- If the link will take students outside your course Canvas site:
- Type a short descriptive phrase for the link in the spot you want the link to appear in your assignment instructions (e.g., NOAA’s Heat and Health Tracker).
- Highlight the short descriptive phrase and select the link icon in the editing menu. If you don’t see the link icon, select the three vertical dots in the edit menu and look for the link icon there.
- Select “External link,” paste the URL into the “Link” box, and select “Done.”
- If you want to link to another page in your course’s Canvas site:
- Click the spot in your page where you’d like the link to appear.
- Select the link icon in the editing menu. If you don’t see the link icon, select the three vertical dots in the edit menu and look for the link icon there.
- Select “Course link.” From the side menu that appears, select the page, assignment, etc. in your Canvas site you would like to link to. Canvas will automatically create a link in your page to whatever you select.
- Avoid using the full URL in your Canvas page since screen readers will read out each character in the URL.
- Save.
- If you’re not already in edit mode, select the “Edit” button near the top of the page.
- Highlight the text that you want to format as a list.
- Select the list icon in the editing menu (appears as three vertical dots next to three horizontal lines) and choose the type of bullets/numbers. If the list describes the order of an action or ranking, choose a numbered list; use a bulleted list for all other lists.
- Save.
Some instructors prefer to embed an external resource document, like a Word document, when creating a Canvas assignment.
- Ensure the Word document you are going to embed is accessible (see information further down this page).
- Create a Canvas assignment by selecting “Assignments” in the course navigation menu and clicking the “+Assignment” button near the top of the page.
- Title your assignment.
- Insert your document:
- If the document you wish to embed into the assignment is already in your Canvas course files, select Insert > Document > Course Document and select the file to insert into the assignment.
- If the document you wish to embed into the assignment is NOT already in your Canvas course files, select Insert > Document > Upload Document. Drag and drop your file into the Upload File box, or click into the box to browse your computer for the file you want to upload.
- Select “Submit.”
- Complete the rest of the assignment creation steps (e.g., assigning points, setting the due date).
- Save.
- If you’re not already in edit mode, select the “Edit” button near the top of the page.
- Select the accessibility checker icon at the bottom of the editing space. For more on how to find this accessibility checker, visit the Accessibility checkers and tools page.
- Address the accessibility errors identified by the Canvas accessibility checker.
Microsoft Word assignments and handouts
To ensure that instructions are consistent and not complicated by different desktop versions of Microsoft Word, the steps below focus on the Microsoft Word version available through UW Office 365.
- After opening your Word document, select “Home” from the menu tabs at the top of the document.
- Highlight the text that you want to become the heading.
- Click into the dropdown menu on the “Home” ribbon with the word “Normal” in it.

- Headings should form an outline of the content of your assignment or handout, so choose the heading that corresponds to the structure of your assignment or handout. Main headings (e.g., “Instructions,” “Expectations”) should use Heading 1.
- Sub-headings under main headings should use Heading 2. Subsequent subheadings should use Heading 3, Heading 4, etc. To insert a Heading 3 or Heading 4, select the dropdown menu in the box on the Home ribbon with the word “Normal” in it and select “See More Styles.” Scroll down through the alphabetized list to “Headings” and select the appropriate heading level. Headings should always proceed chronologically and not skip levels.
- Select “Insert” from the menu tabs at the top of your Word document.
- Copy the URL you would like to include in your assignment or handout.
- Type a short descriptive phrase for the link in the spot you want the link to appear in your assignment or handout. For example, if you want to link to an article or resource, you might type the title of the article or resource (e.g., “Long-term effects of metacognitive strategies” or UW Libraries). Avoid using “Click here” or “Read more” — these phrases are not useful for someone using a screen reader. Avoid using the full URL in the text since screen readers will read out each character in the URL.
- Highlight the short descriptive phrase and then select the link icon (it appears as a broken oval with a horizontal line) in the “Insert” ribbon.
- Paste the URL in the “Enter Link “field, and select “Insert.”
- Select “Home” from the menu tabs at the top of your Word document.
- Highlight the text that you want to format as a list.
- Select the list icon in the editing menu (appears as three vertical dots next to three horizontal lines) and choose the type of bullets/numbers. If the list describes the order of an action or ranking, choose a numbered list; use a bulleted list for all other lists.
- Identify whether your table conveys numerical data. If it does not, do not use a table; use paragraphs with headings or bulleted lists. Note: It is very difficult to make a complex table (e.g., with merged cells, multi-level columns, nested rows, etc.) accessible. Please reach out to help@uw.edu for help with complex tables.
- When a table is added to a document in Word, two new tabs will appear in the ribbon: Table Design, and Layout.
- Clicking into your table will make a “Table” option appear in the menu tabs. Highlight the top row in your table.
- Scroll across the icons menu to the “Style Options” icon. Select the icon and select “Header Row” from the drop down menu.
Word (along with other Microsoft Office products) has a built-in accessibility checker, which you can use to identify common accessibility issues. We recommend using this as the last step of your creation process, to make sure nothing was missed.
Depending on your version of Word, you can either find this function as a button (labeled “Accessibility Checker”), or under the “Review” tab (labeled “Check Accessibility”). For more on how to find this accessibility checker, visit the Accessibility checkers and tools page.
Google assignments
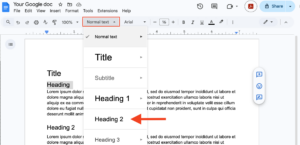
- Highlight the text that you want to become the heading.
Click into the dropdown menu on the toolbar that reads “Normal text.” If there is already a heading in place, this box might have a different label. - Headings should form an outline of the content of your assignment or handout, so choose the heading that corresponds to the structure of your assignment or handout. Main headings (e.g., “Instructions,” “Expectations”) should use Heading 1.
- Sub-headings under main headings should use Heading 2. Subsequent subheadings should use Heading 3, Heading 4, etc. Headings should always proceed chronologically and not skip levels.
- Sub-headings under main headings should use Heading 2. Subsequent subheadings should use Heading 3, Heading 4, etc. Headings should always proceed chronologically and not skip levels.
- Copy the URL you would like to include in your assignment or handout.
- Select the link icon from the toolbar (a broken oval with a line in the middle). If you don’t see this icon, select the three vertical dots at the right end of the toolbar.
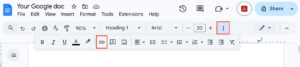
- In the window that pops up, type a short descriptive phrase for the link in the box labeled “Text.” For example, if you want to link to an article or resource, you might type the title of the article or resource (e.g., “Long-term effects of metacognitive strategies” or UW Libraries). Avoid using “Click here” or “Read more” — these phrases are not useful for someone using a screen reader. Avoid using the full URL in the text since screen readers will read out each character in the URL.
- In the box labeled “Search or paste a link,” past the URL to which you would like to link and select “Apply.”
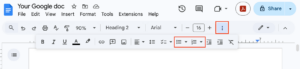
- Highlight the text that you want to format as a list.
- Select either the bulleted list icon (three vertical dots next to three horizontal lines) or the numbered ist icon (numbers 1-3 next to three horizontal lines) from the toolbar. If you don’t see this icon, select the three vertical dots at the right end of the toolbar. If your list describes the order of an action or ranking, choose a numbered list; use a bulleted list for all other lists.
- Identify whether your table conveys numerical data. If it does not, do not use a table; use paragraphs with headings or bulleted lists. Note: It is very difficult to make a complex table (e.g., with merged cells, multi-level columns, nested rows, etc.) accessible. Please reach out to help@uw.edu for help with complex tables.
- Identify whether your table conveys numerical data. If it does not, do not use a table; use paragraphs with headings or bulleted lists. Note: It is very difficult to make a complex table (e.g., with merged cells, multi-level columns, nested rows, etc.) accessible. Please reach out to help@uw.edu for help with complex tables.
- After inserting your table, right click the first cell. In the dropdown menu that appears, select “Insert title row.”
Grackle, the accessibility checker available in Google, can identify accessibility issues in your Google Docs, Sheets, or Slides and provides guidance for how to fix them. To use Grackle, you will need to first install it. For instructions on how to install Grackle and locate it in a Google doc, visit the Accessibility checkers and tools page.
PDF assignments and handouts (not recommended)
Creating an accessible PDF assignment or handout is not recommended because it is a labor-intensive process that may require access to additional subscription-based software.
Creating a PDF using the “Save As” or “Print to PDF” options in Word or Powerpoint does not produce an adequately accessible document. Sharing documents in their native format (e.g., Word or Canvas), following the guidelines above, is recommended. Students who want a PDF version can always save the file you share with them as a PDF.
Adobe Acrobat Pro DC subscribers can follow the guidance on Accessible Technology Services’ Checking PDFs for accessibility webpage.
Need additional guidance or help troubleshooting? Contact help@uw.edu.